90
Prep (min)
30
Cook (min)
12
Servings
Medium
Level
Introduction
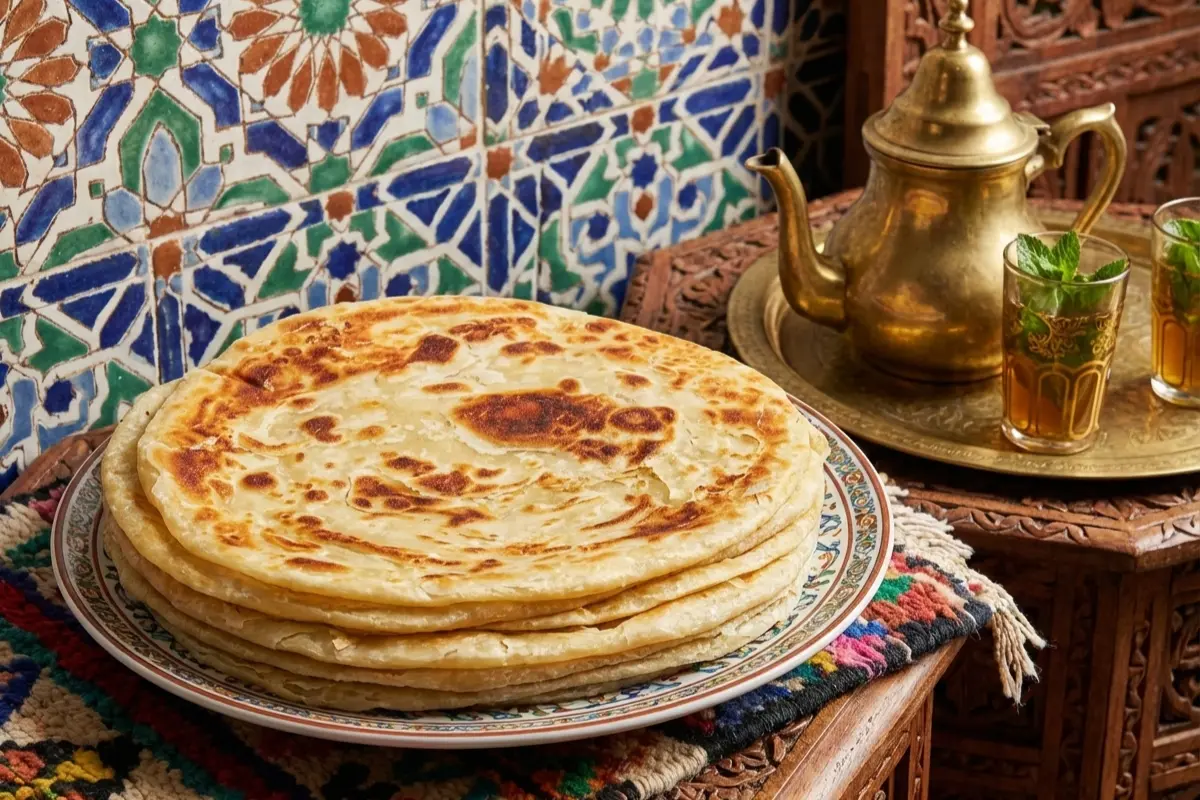
Msemen, also known as rghaif in some regions, stands as one of Morocco's most beloved culinary treasures - a flaky, buttery flatbread that graces breakfast tables throughout the country and serves as the ultimate comfort food any time of day. These square-shaped, pan-fried beauties possess an almost magical quality: countless paper-thin layers that shatter delicately when you bite into the crispy exterior, giving way to a tender, slightly chewy interior that pulls apart in gossamer sheets. The contrast between the golden, crispy surface and the soft, layered interior creates an addictive texture that has made msemen a staple of Moroccan cuisine for generations.
The art of making msemen is deeply embedded in Moroccan culinary tradition, passed down from mothers to daughters through hands-on practice rather than written recipes. In Morocco, the ability to make perfect msemen - with paper-thin layers, even cooking, and that signature square shape - is considered a mark of culinary skill. Street vendors prepare hundreds daily, their practiced hands working the dough with mesmerizing speed and precision. The rhythmic slap of dough being stretched, the sizzle as it hits the hot griddle, and the irresistible aroma of butter toasting on the pan are familiar sounds and smells in Moroccan neighborhoods every morning.
What distinguishes msemen from other flatbreads is the unique folding technique that creates its characteristic layers. The dough is stretched paper-thin, brushed with butter and sometimes sprinkled with semolina, then folded into a square package that traps air between the layers. When cooked on a hot griddle, these layers separate and crisp, creating the flaky texture that makes msemen so irresistible. Traditionally enjoyed for breakfast with honey, butter, or olive oil, msemen also serves as an accompaniment to tagines, pairs beautifully with Moroccan mint tea, and can even be stuffed with savory fillings to create variations. The process requires patience and practice - your first attempts may not be perfect, but the forgiving dough and the delicious results make the learning curve worthwhile and enjoyable.
About This Recipe
Msemen holds a cherished place in Moroccan culinary tradition, with roots stretching back centuries through the country's Berber heritage. The technique of creating layered flatbreads by folding and stretching dough is ancient, shared across North Africa and the Middle East, though each culture has developed its own distinctive variations. In Morocco, msemen has evolved into an art form, with the characteristic square shape and delicate layering technique passed down through generations. The name 'msemen' comes from the Arabic word for 'buttered' or 'fattened,' a reference to the generous butter that creates its signature flaky layers. Historically, msemen was prepared by women in the home for daily breakfast or special occasions, with the skill required to produce paper-thin layers considered a mark of culinary expertise. In rural areas, msemen was often made with smen (preserved butter) which added distinctive aged, funky flavors and helped preserve the flatbreads for longer periods - important in times before refrigeration. As Morocco urbanized, street vendors began selling freshly made msemen from small griddles, and it became popular street food enjoyed throughout the day. Today, msemen remains a breakfast staple across all social classes, served in humble homes and upscale restaurants alike. It appears on festive tables during Ramadan for iftar meals, is sold from street carts in medinas, and graces breakfast spreads in riads and hotels. The technique has been adapted by the Moroccan diaspora worldwide, becoming a way to maintain cultural connection and share Moroccan hospitality. Despite modern conveniences, many families still prefer to make msemen by hand using traditional methods, as the tactile process and the incomparable taste of freshly made msemen cannot be replicated by any shortcut. The rhythmic process of stretching, folding, and cooking has become almost meditative, connecting modern cooks to centuries of Moroccan culinary tradition.
Nutrition / serving
Recipe Tags
Understanding the Ingredients
All-Purpose Flour and Semolina
The foundation of msemen dough requires a combination of all-purpose flour for structure and fine semolina (not coarse semolina used for couscous) for texture and flavor. The all-purpose flour provides gluten development necessary for the dough to stretch thin without tearing, while semolina adds a slightly grainy texture and subtle sweetness. The ratio is typically three parts all-purpose flour to one part fine semolina, though some cooks use all-purpose flour exclusively. Using a combination yields msemen with better texture and more authentic flavor. The flour should be measured properly - too much makes the dough tough and difficult to work with, while too little results in dough that tears when stretched. Sifting the flour is not necessary but can help prevent lumps in the dough.
Warm Water
Warm water activates the gluten in the flour and makes the dough more pliable and easier to work with. The water should be warm to the touch but not hot - around 100-110°F or body temperature. Water that is too hot can start cooking the flour and create a paste rather than dough, while cold water makes the dough stiff and difficult to knead. The exact amount of water needed can vary based on humidity, flour type, and other factors, so add it gradually and adjust as needed. The dough should be very soft and slightly sticky when first mixed - softer than typical bread dough. This softness is crucial for being able to stretch the dough paper-thin during the folding process.
Butter or Oil Mixture
The rich, layered texture of msemen comes from generous applications of fat between the layers. Traditional msemen uses a mixture of melted butter and vegetable oil, which provides flavor, promotes browning, and keeps the layers separate during cooking. Some cooks use only butter for richer flavor, while others use only oil for a lighter result. The combination of both works beautifully - butter for flavor and oil to prevent the butter from burning at high heat. You will need fat in two stages: a small amount mixed into the dough itself to make it tender, and a larger quantity for brushing between the layers during folding. Smen (Moroccan preserved butter) is traditional and adds distinctive funky, cheese-like notes, but regular butter works perfectly. The fat should be at room temperature for easy spreading.
Fine Semolina for Dusting
Beyond the semolina mixed into the dough, you need additional fine semolina for dusting between the layers during the folding process. This dusting serves multiple purposes: it prevents the layers from sticking together completely, adds subtle texture and flavor, and helps absorb any excess moisture. The semolina should be fine, not the coarse variety used for making couscous. Some recipes call for dusting with flour instead, which also works, though semolina is more traditional and provides better texture. A light, even dusting is all that is needed - too much will make the layers separate too much and prevent proper cooking.
Salt and Sugar
A small amount of salt is essential for flavor - it enhances all the other ingredients and prevents the msemen from tasting flat. Fine salt dissolves more easily in the dough than coarse salt. Some recipes include a small amount of sugar (just a teaspoon or two for the entire batch), which provides subtle sweetness, helps with browning, and improves the texture. The sugar is optional and traditionally not used in all regions - msemen can be completely savory or slightly sweet depending on preference and intended serving method. If planning to serve with honey, some cooks add a bit of sugar to the dough; if serving with savory dishes, they omit it entirely.
Baking Powder (Optional)
Some modern recipes include a small amount of baking powder in the dough, which creates slightly puffier, more tender msemen with better layer separation. This is not traditional - classic msemen relies solely on the folding technique for layers - but many contemporary cooks find that a half teaspoon of baking powder per batch improves the texture and makes the msemen more forgiving for beginners. The baking powder should be aluminum-free for best flavor. Traditionalists insist that proper technique makes baking powder unnecessary, and they are correct, but it can help ensure success for those still developing their skills.
Step-by-Step Cooking Guide
Mix and Knead the Dough
15 minIn a large mixing bowl, combine three cups of all-purpose flour, one cup of fine semolina, one and a half teaspoons of salt, one teaspoon of sugar (if using), and half a teaspoon of baking powder (if using). Whisk the dry ingredients together to distribute evenly. Make a well in the center and add two tablespoons of soft butter or vegetable oil. Begin adding warm water gradually, starting with one and a quarter cups, while mixing with your hand or a wooden spoon. Continue adding water a tablespoon at a time until the dough comes together into a shaggy mass. Turn the dough out onto a clean work surface and knead vigorously for eight to ten minutes until it becomes very smooth, elastic, and quite soft - softer than bread dough. The dough should be slightly tacky but not sticky enough to leave significant residue on your hands. If it feels too dry and stiff, knead in a bit more water; if too sticky, add a little flour. Proper kneading develops the gluten that allows the dough to stretch thin without tearing.
Tip: The dough should be very soft and pliable - do not be afraid of it being too soft. A slack, soft dough is essential for stretching thin. Knead until the dough is silky smooth and springs back when poked.
Rest and Divide the Dough
50 minCoat the kneaded dough lightly with oil to prevent drying, place it in a bowl, and cover tightly with plastic wrap or a damp towel. Let rest at room temperature for at least thirty minutes, though one to two hours is even better. This resting period allows the gluten to relax, making the dough much easier to stretch thin. After resting, prepare your work surface by coating it lightly with oil - you will be working on an oiled surface, not a floured one. Divide the dough into twelve equal portions, each about the size of a golf ball or slightly larger. Roll each portion into a smooth ball between your palms, ensuring there are no cracks or dry spots. Place the balls on an oiled plate or tray, leaving space between them. Brush the tops lightly with oil and cover loosely with plastic wrap. Let rest for another fifteen to twenty minutes. This second rest makes the dough even more extensible.
Tip: The longer the dough rests, the easier it will be to stretch. If time permits, let it rest for two hours or even overnight in the refrigerator (bring to room temperature before working). Well-rested dough is the secret to paper-thin layers.
Prepare Your Work Station
10 minBefore beginning to shape the msemen, organize your work area efficiently. You will need: a clean, smooth work surface generously coated with oil (a large cutting board or countertop works well); a small bowl of the butter-oil mixture for brushing (half butter, half oil melted together, about one-half cup total); a small bowl of fine semolina for sprinkling; a pastry brush or your fingers for applying the butter mixture; a plate or tray for holding the formed msemen before cooking; and plastic wrap to cover them. Having everything within easy reach makes the process much smoother. Heat a large, heavy skillet or griddle over medium heat - cast iron works beautifully, as does a non-stick pan. The pan needs to heat while you form the msemen so it is ready when you are.
Tip: Work on a very smooth surface - any texture will prevent the dough from stretching properly. Marble, granite, or smooth laminate countertops are ideal. A large cutting board works but should be completely smooth.
Stretch the First Msemen
5 minTake one ball of dough and place it on your generously oiled work surface. Using your fingertips, press and pat the ball into a small disk about four inches in diameter. Now begins the stretching: working from the center outward, use your fingertips to gently press and pull the dough, gradually stretching it into a thin, translucent sheet. Rotate the dough frequently as you work, stretching evenly in all directions. The goal is a very thin sheet approximately twelve to fifteen inches in diameter - thin enough that you could almost see through it if held up to the light. Do not worry if you get a few small holes; they will not affect the final result significantly. This takes practice, so be patient. If the dough resists stretching, let it rest for a few minutes and try again. The dough should stretch easily without springing back if properly rested. Once stretched thin, use your hands to shape it into a rough rectangle or square for easier folding.
Tip: Use plenty of oil on your work surface - it prevents sticking and helps with stretching. If the dough keeps springing back, it needs more rest. Work gently and patiently; forcing it will tear the dough.
Layer and Fold into a Square
7 minWith the dough stretched thin before you, brush the entire surface generously with the butter-oil mixture using a pastry brush or your fingers. Do not be shy with the butter - this is what creates the layers and flavor. Sprinkle a light, even coating of fine semolina over the butter. Now fold the msemen: first, fold the left and right sides toward the center, overlapping slightly to create a long rectangle. Brush the top with more butter and sprinkle with a bit more semolina. Next, fold the top and bottom ends toward the center, again overlapping slightly, creating a square package roughly four to five inches on each side. The folding traps air and butter between the layers, which will separate during cooking. Press the square gently to seal the folds. Place the formed msemen on an oiled plate, brush the top with a bit more butter to prevent drying, and cover with plastic wrap. Repeat this stretching and folding process with all remaining dough balls.
Tip: The more generous you are with butter between the layers, the flakier the result. Do not skimp. The folds do not need to be perfect - rustic is fine. Just ensure the package is relatively compact and square-ish.
Rest the Formed Msemen
15 minOnce all the dough balls have been stretched, buttered, and folded into squares, let them rest on the plate, covered, for at least ten to fifteen minutes before cooking. This final rest allows the gluten to relax again and lets the layers settle, which helps prevent the msemen from shrinking when placed on the hot pan. During this time, the butter between the layers also firms up slightly if your kitchen is cool, which can help the layers stay distinct during cooking. You can prepare the msemen to this point several hours ahead and refrigerate them until ready to cook - just bring them to room temperature for ten to fifteen minutes before cooking for best results.
Tip: If stacking the formed msemen on a plate, place a piece of parchment or plastic wrap between each one to prevent sticking. Keep them covered to prevent the surface from drying out, which would prevent even browning.
Cook the Msemen
30 minEnsure your skillet or griddle is heated to medium heat - test by sprinkling a few drops of water on the surface; they should sizzle immediately but not violently evaporate. The pan should not be smoking hot. Take one of the formed msemen squares and place it carefully in the pan. Do not add any oil to the pan - the butter in and on the msemen is sufficient. Cook for two to three minutes without moving it, until the bottom is golden brown with darker spots and the top begins to look slightly dry around the edges. Using a spatula, flip the msemen and cook the second side for another two to three minutes until golden brown. Press gently with the spatula while cooking to encourage even contact with the pan and promote crisping. The msemen should develop a golden, crispy exterior while the interior cooks through and the layers separate. You may see steam escaping, which indicates the layers are forming properly. Transfer the cooked msemen to a plate and immediately cover loosely with a clean kitchen towel to keep warm and slightly soften the exterior. Repeat with remaining msemen.
Tip: Maintain consistent medium heat - too low and the msemen will be tough and dry; too high and the outside burns before the inside cooks. The first one may not be perfect as you calibrate the heat - adjust as needed.
Serve Warm
5 minMsemen are best enjoyed warm from the pan, when the layers are most distinct and the exterior is crispy. As they cool, the exterior softens slightly, which many people actually prefer for the tender texture. Stack the cooked msemen on a serving plate and serve immediately with your choice of accompaniments. Traditional options include honey, jam, butter, olive oil with olives, or soft cheese. Msemen is also commonly served alongside tagines, soups, or mint tea. For a classic Moroccan breakfast, tear off pieces of warm msemen and dip them into honey mixed with butter, or simply drizzle honey over the top and let it seep into the layers. The contrast of the buttery, savory flatbread with sweet honey is sublime. Leftover msemen can be stored and reheated, though they are never quite as perfect as freshly made.
Tip: If making a large batch, keep cooked msemen warm in a low oven (200°F) covered with foil while you finish cooking the rest. This prevents them from getting cold and maintains some crispiness.
Common Mistakes to Avoid
✗ Dough That is Too Stiff
Fix: Msemen dough must be very soft and pliable to stretch thin. If your dough is stiff like bread dough, add water a tablespoon at a time and knead until soft and slightly tacky. Soft dough is essential for paper-thin layers.
✗ Not Resting the Dough Long Enough
Fix: Skipping or shortening the resting periods makes the dough elastic and difficult to stretch - it will keep springing back. Always rest the dough at least thirty minutes after kneading and again after dividing. Longer is better.
✗ Stretching on a Floured Surface
Fix: Unlike most dough work, msemen should be stretched on an oiled surface, not floured. Flour prevents the thin dough from sticking to the work surface properly and makes it harder to stretch thin. Always use generous oil.
✗ Being Too Timid with Butter
Fix: The layers and flavor of msemen come from generous butter between the folds. Many beginners use too little butter, resulting in msemen that lack flaky layers. Brush generously - the butter should be visible on the surface.
✗ Cooking at Too High Heat
Fix: High heat burns the exterior before the interior cooks through and the layers separate properly. Medium heat is essential - the msemen should cook through in about two to three minutes per side. If browning in less than two minutes, reduce the heat.
✗ Tearing the Dough While Stretching
Fix: If the dough tears frequently while stretching, it either needs more rest, more water in the dough, or gentler handling. A few small holes are fine, but major tears indicate the dough needs adjustment. Let it rest longer if it resists stretching.
✗ Not Working Fast Enough
Fix: Once stretched thin, the dough can dry out if left too long before folding. Work at a steady pace: stretch, butter, sprinkle, fold, and move to the next one. Have all your ingredients and tools ready before you begin shaping.
Ingredient Substitutions
Instead of: Fine Semolina
Use: You can use all-purpose flour exclusively for the dough, though the texture will be slightly different. For dusting between layers, flour works fine instead of semolina, though semolina provides better texture.
Instead of: Butter
Use: Vegetable oil can replace butter entirely for dairy-free msemen, though the flavor will be less rich. Ghee or clarified butter works beautifully and prevents burning at high heat. Smen (preserved butter) is traditional and adds unique flavor.
Instead of: All-Purpose Flour
Use: Bread flour works and actually makes the dough slightly easier to stretch thin due to higher gluten content. Whole wheat flour can be used for a portion (up to half) for a more rustic, wholesome version, though it will be less pliable.
Serving Suggestions
For classic Moroccan breakfast, serve warm msemen with honey and butter, tearing off pieces and dipping them into the sweet mixture. This is how most Moroccans enjoy their morning msemen.
Accompany with Moroccan mint tea for an authentic experience. The sweet tea complements the buttery flatbread perfectly and is traditional for breakfast or afternoon snacks.
Serve alongside tagines, using torn pieces of msemen to scoop up the flavorful sauce - this is common in Moroccan homes where msemen replaces or supplements bread.
For a savory breakfast, serve with soft cheese (like jben, Moroccan fresh cheese), olives, and olive oil, creating a Mediterranean-style spread.
Drizzle with amlou (a spread made from argan oil, almonds, and honey) for a luxurious Moroccan treat that showcases the country's prized argan oil.
Stuff cooled msemen with savory fillings like spiced ground meat, vegetables, or cheese, then reheat on the griddle for stuffed msemen (msemen mahshi).
Cut into triangles or squares and serve as an appetizer with various dips like zaalouk (eggplant salad), taktouka (pepper and tomato salad), or hummus.
Storage & Reheating
Storage
Freshly made msemen are always best, but they store reasonably well. Let cooled msemen come to room temperature, then stack them with parchment paper between each one to prevent sticking. Store in an airtight container or resealable plastic bag at room temperature for up to two days, in the refrigerator for up to five days, or freeze for up to three months. For freezing, wrap individually or stack with parchment between them, then place in a freezer bag. Frozen msemen can be reheated directly from frozen without thawing. Unbaked, formed msemen can be frozen on a baking sheet until solid, then transferred to a freezer bag and cooked directly from frozen, adding an extra minute to the cooking time.
Reheating
To restore some of the crispy texture, reheat msemen on a dry skillet or griddle over medium heat for about one minute per side until warmed through and crisped slightly. Alternatively, reheat in a toaster oven for three to four minutes. Microwave reheating works for convenience but will make the msemen soft rather than crispy - if microwaving, wrap in a damp paper towel and heat for thirty to forty-five seconds. For frozen msemen, thaw overnight in the refrigerator or at room temperature for an hour, then reheat on the griddle.
Msemen are most forgiving of storage and reheating compared to many flatbreads - the layers and butter content help them maintain texture better than plain breads. However, nothing beats freshly made. If planning to serve msemen for breakfast, consider preparing the dough the night before, dividing it into balls, and refrigerating overnight. In the morning, bring to room temperature for thirty minutes, then stretch, fold, and cook fresh.
Frequently Asked Questions
Recipe by

Abdrahman Idrissi
عبد الرحمن الإدريسي
Pastry & Bread Chef
View all recipes by Abdrahman →
You May Also Like
Our Ebooks

The Moroccan Vegan
$12.56

The Royal Moroccan Table — Part 1
$9.99

The Royal Moroccan Table — Part 2
$9.99
YouTube
Watch step-by-step cooking videos and learn traditional Moroccan techniques.
450+
Subscribers
150+
Videos