120
Prep (min)
45
Cook (min)
40
Servings
Hard
Level
Introduction
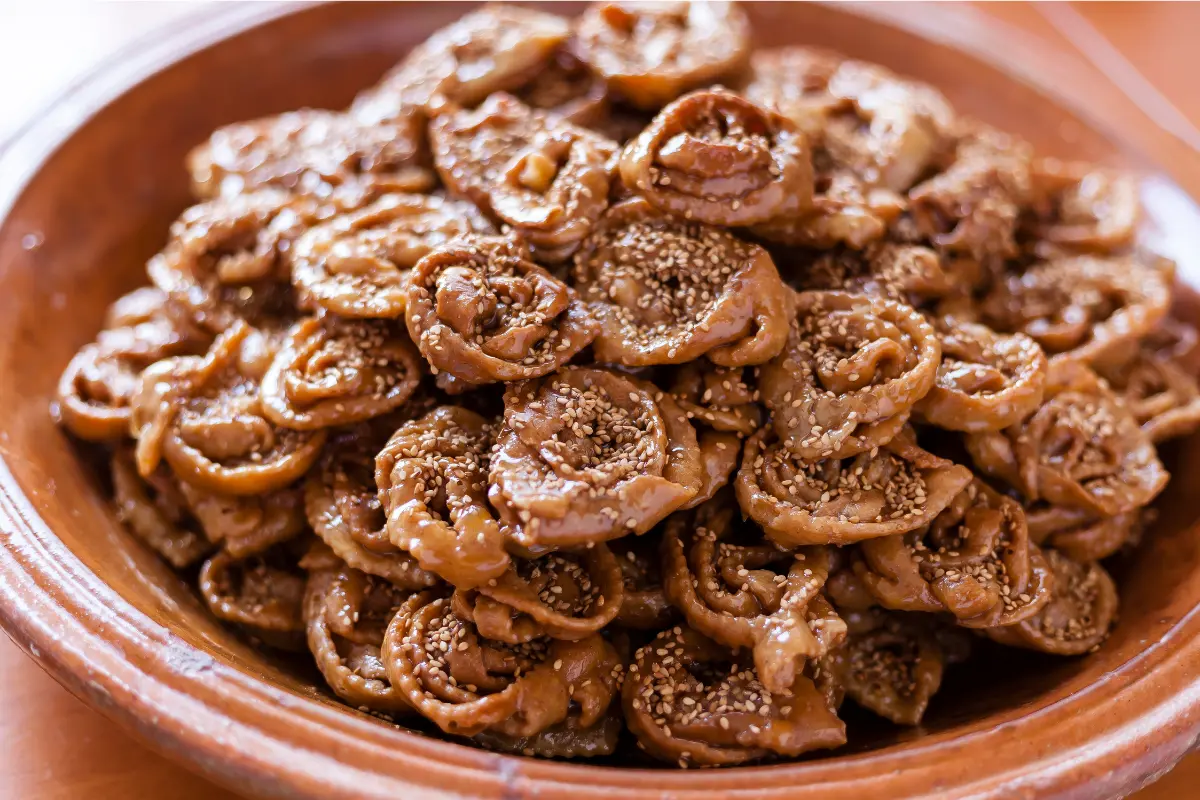
Chebakia, also known as griwech or m'kharqa, represents the pinnacle of Moroccan pastry artistry - intricately shaped flower-like cookies that are as beautiful to behold as they are delicious to eat. These golden, crispy pastries, glistening with honey and generously coated with toasted sesame seeds, are the undisputed stars of Ramadan tables throughout Morocco. The sight of platters piled high with these amber-colored, glossy treats signals the breaking of the fast and embodies the warmth, tradition, and celebration of the holy month.
The creation of chebakia is a labor-intensive process that has been passed down through generations of Moroccan women, each family guarding their own special touches and techniques. The name 'chebakia' comes from the Arabic word 'shabaka,' meaning net or lattice, referring to the distinctive woven, flower-like shape achieved through careful folding and cutting. Making chebakia requires patience, precision, and practiced hands - the dough must be rolled thin, cut into specific strips, folded into intricate patterns, deep-fried to golden perfection, then immediately dunked in hot honey and showered with sesame seeds while still warm. The process often becomes a communal activity, with mothers, daughters, aunts, and grandmothers gathering in kitchens days before Ramadan to prepare hundreds of these precious cookies.
What makes chebakia truly extraordinary is the complexity of flavors and textures: the dough itself is enriched with butter, eggs, and aromatic spices including anise, cinnamon, and saffron, then perfumed with orange blossom water and vinegar which creates a tender, slightly tangy base. Deep frying transforms the delicate dough into crispy, golden layers with a slight crunch. The warm honey soak adds intense sweetness and creates the signature glossy coating, while toasted sesame seeds provide nutty flavor and textural contrast. The result is a cookie that is simultaneously crispy and slightly chewy, sweet yet complex, with layers of flavor that unfold with each bite. Beyond Ramadan, chebakia appears at weddings, religious celebrations, and any occasion calling for Morocco's finest sweets.
About This Recipe
Chebakia holds a revered place in Moroccan culinary tradition as the quintessential sweet of Ramadan, though its history extends far beyond the holy month. The origins of these intricate pastries are somewhat mysterious, with culinary historians debating whether they emerged from Morocco's Berber communities, arrived with Arab influences, or developed from Moorish Andalusian sweets brought by refugees fleeing the Spanish Reconquista. What is certain is that chebakia has been a fixture of Moroccan celebrations for centuries, with the technique passed down through countless generations of women who perfected the art of creating these edible flowers. The name 'chebakia' derives from 'shabaka,' meaning net or lattice in Arabic, referring to the woven pattern of the dough. In some regions, they are called 'griwech' or 'm'kharqa,' reflecting Morocco's linguistic diversity. Historically, chebakia was labor-intensive and required expensive ingredients like saffron, honey, and sesame seeds, making it a luxury reserved for special occasions and wealthy households. The preparation traditionally involved entire families working together - women gathering in kitchens to roll, cut, shape, fry, and coat hundreds of these precious cookies in the days leading up to Ramadan. This communal preparation strengthened family bonds and passed skills from elders to younger generations. The distinctive flower shape is not merely decorative but symbolic, representing beauty, blessing, and the flourishing of faith during the holy month. As Morocco modernized, chebakia remained steadfast as the symbol of Ramadan, appearing in humble homes and royal palaces alike. Today, while commercial bakeries produce chebakia, many families still insist on making them at home, maintaining the tradition and the incomparable taste of homemade sweets. The sight of golden chebakia piled high on platters signals the breaking of the fast and embodies centuries of Moroccan hospitality, craftsmanship, and the enduring importance of culinary tradition in maintaining cultural identity.
Nutrition / serving
Recipe Tags
Understanding the Ingredients
All-Purpose Flour
The foundation of chebakia dough requires high-quality all-purpose flour that provides structure while remaining tender enough to create delicate, crispy layers. You will need approximately four to five cups, though the exact amount varies based on humidity, egg size, and other factors. The flour should be sifted before measuring to remove lumps and aerate it, which helps create lighter pastries. Some traditional recipes use a combination of all-purpose flour and a small amount of fine semolina for added texture, though this is optional. The dough needs to be firm enough to hold the intricate folded shape during frying but tender enough to create delicate, crispy layers rather than tough cookies.
Eggs and Egg Yolks
Eggs provide richness, color, and structure to chebakia dough. Most recipes use whole eggs plus additional egg yolks for extra richness and that characteristic deep golden color. The eggs also help bind the dough and create tender layers. Room temperature eggs incorporate more easily into the dough than cold eggs straight from the refrigerator. The number of eggs can vary by recipe - typically two to three whole eggs plus two to three additional yolks for a batch making about forty cookies. The yolks add luxurious richness and contribute to the beautiful golden color after frying.
Butter and Oil
Fat is essential in chebakia dough for flavor, tenderness, and creating the flaky texture. Traditional recipes use a combination of melted butter (or smen - Moroccan preserved butter) and vegetable oil. The butter provides rich flavor while the oil keeps the dough tender and prevents it from becoming too stiff when chilled. You will need approximately half a cup of melted butter and quarter cup of oil for the dough. Smen, if you can find it, adds a distinctive funky, aged flavor that is traditional and highly prized. The fat should be at room temperature when added to ensure even distribution throughout the dough.
Aromatic Spices
The spice blend is what gives chebakia its distinctive, complex flavor that sets it apart from simple fried cookies. Anise seeds (whole or ground) provide that characteristic licorice-like flavor that is essential to authentic chebakia. Ground cinnamon adds warmth and sweetness. Saffron threads, though expensive, contribute subtle floral notes and golden color - a small pinch goes a long way. Some recipes include ground mastic (Arabic gum), which adds unique resinous notes and helps create a tender texture. These spices should be fresh and aromatic - stale spices will produce flat-tasting chebakia. The spices are typically bloomed in the warm butter to release their essential oils before being incorporated into the dough.
Orange Blossom Water and Vinegar
Orange blossom water is absolutely essential to chebakia, providing the distinctive floral perfume that is signature to this pastry. It is added to the dough and sometimes also mixed into the honey syrup. Use high-quality, food-grade orange blossom water - the amount should be generous but not overwhelming. White vinegar or apple cider vinegar is a surprising but traditional ingredient that serves multiple purposes: it tenderizes the dough, helps create a crispy texture when fried, and adds a subtle tang that balances the intense sweetness of the honey coating. The combination of floral orange blossom water and sharp vinegar creates a complex flavor base that elevates chebakia beyond simple sweet cookies.
Honey
The honey coating is what transforms fried dough into magnificent chebakia. You need pure, high-quality honey - typically one to two cups depending on batch size. The honey should be warmed until thin and liquid but not boiling, which would destroy its flavor and nutritional properties. Some cooks add a bit of butter to the honey for extra richness and shine. The fried cookies are dipped while still hot into the warm honey, which allows the honey to penetrate slightly and create that characteristic glossy coating. Orange blossom honey is traditional and ideal, as its floral notes complement the orange blossom water in the dough. The honey should be genuine and pure - artificial honey or honey blends will not provide the same flavor or texture.
Sesame Seeds
Toasted sesame seeds provide the final, essential layer of flavor and texture. You will need approximately one to two cups of white sesame seeds, which must be toasted before use to develop their nutty flavor and aroma. The toasting is crucial - raw sesame seeds taste bland and have a different texture. Toast the seeds in a dry skillet over medium heat, stirring constantly, until golden and fragrant. The hot, honey-coated chebakia are rolled in or sprinkled with the toasted sesame seeds while the honey is still sticky, creating that signature generous coating. The sesame seeds add nutty flavor, visual appeal, and pleasant crunch that contrasts with the honey-soaked pastry.
Baking Powder and Yeast
Some modern recipes include small amounts of baking powder or even yeast to create a slightly lighter, more tender texture with better rise during frying. Traditional recipes often omit leavening entirely, relying on the eggs and the steam created during frying to create lift. A small amount of baking powder (one teaspoon) can help create a slightly more tender texture without affecting the traditional character. If using yeast (less common), only a small amount of instant yeast is needed. The goal is not bread-like rise but rather slight tenderness and texture improvement.
Step-by-Step Cooking Guide
Prepare and Bloom the Spices
10 minBegin by toasting one tablespoon of anise seeds in a dry skillet over medium heat for two to three minutes until fragrant. Let cool, then grind to a fine powder using a spice grinder or mortar and pestle. In a small saucepan, melt half a cup of butter over low heat. Add the ground anise, one tablespoon of ground cinnamon, and a generous pinch of saffron threads (about twenty threads). Let the spices bloom in the warm butter for two to three minutes, stirring occasionally, until the mixture is very fragrant and the saffron has colored the butter golden. Remove from heat and let cool to room temperature. This blooming process releases the essential oils and creates a more aromatic, flavorful dough. If using ground mastic, add it to the butter as well.
Tip: Do not let the butter get too hot or the spices will burn and taste bitter. The goal is gentle warmth to release the aromatic compounds. Fresh, high-quality spices are essential for proper flavor.
Mix the Wet Ingredients
5 minIn a large mixing bowl, beat two whole eggs plus two egg yolks until well combined and slightly frothy. Add quarter cup of vegetable oil, quarter cup of white vinegar, quarter cup of orange blossom water, and two tablespoons of granulated sugar. Whisk together until smooth and emulsified. Add the cooled spiced butter mixture and whisk again until everything is well incorporated. The mixture should be smooth, golden-yellow, and very aromatic from the spices and orange blossom water. This wet mixture forms the base that will be combined with flour to create the dough.
Tip: Make sure the butter mixture is cooled to room temperature before adding to the eggs, or it may scramble them. All wet ingredients should be at room temperature for best emulsification.
Form the Dough
15 minIn a separate large bowl, sift together four cups of all-purpose flour, one teaspoon of baking powder, and half a teaspoon of salt. Make a well in the center and pour in the wet ingredient mixture. Using your hands or a wooden spoon, begin mixing from the center outward, gradually incorporating the flour into the wet ingredients. Continue mixing until a shaggy dough forms. Turn the dough out onto a clean work surface and knead for eight to ten minutes until it becomes smooth, elastic, and no longer sticky. The dough should be firm but pliable - firmer than bread dough but not as stiff as pasta dough. If the dough is too sticky, add flour a tablespoon at a time; if too dry and crumbly, add a teaspoon of water at a time. Proper kneading develops the gluten that gives the dough structure to hold its intricate shape during frying.
Tip: The dough needs to be quite firm to hold the folded shape during frying. It should not be soft or sticky. Knead thoroughly until smooth and elastic - this is crucial for workable dough.
Rest the Dough
60 minShape the kneaded dough into a ball, coat it lightly with oil to prevent drying, and place it in a bowl. Cover tightly with plastic wrap and let rest at room temperature for at least one hour, though two hours or even overnight in the refrigerator is better. This resting period is essential - it allows the gluten to relax, making the dough much easier to roll thin without springing back. It also allows the flavors to meld and develop. If refrigerating overnight, bring the dough to room temperature for thirty minutes before rolling, as cold dough is difficult to work with. Well-rested dough is the secret to rolling thin sheets that hold their shape.
Tip: The longer the dough rests, the easier it will be to roll and work with. Overnight rest in the refrigerator is ideal if you have time. Proper resting makes a dramatic difference in workability.
Toast Sesame Seeds and Prepare Honey
15 minWhile the dough rests, prepare the coating ingredients. In a large, dry skillet over medium heat, add one and a half cups of white sesame seeds. Toast them, stirring constantly, for five to seven minutes until they are golden brown and smell nutty and fragrant. Watch carefully as they can burn quickly. Transfer to a shallow bowl and set aside. In a medium saucepan, warm one and a half cups of honey over low heat until it becomes thin and pourable but not boiling - you want it warm enough to flow easily but not so hot that it burns or loses its beneficial properties. Some cooks add two tablespoons of butter and a tablespoon of orange blossom water to the honey for extra richness and flavor. Keep the honey warm over very low heat or in a warm water bath.
Tip: Sesame seeds must be stirred constantly during toasting or they will burn in spots. Remove from the hot pan immediately when done to stop cooking. The honey should be warm and fluid but never boiling.
Roll and Cut the Dough
20 minDivide the rested dough into four portions for easier handling. Keep unused portions covered to prevent drying. On a lightly floured surface, roll one portion very thin - about one-eighth inch thick or even thinner if possible. The dough should be thin enough that you can almost see through it. Using a sharp knife or pizza cutter, cut the dough into rectangles approximately three inches by five inches. Then, make three or four parallel cuts lengthwise through each rectangle, starting about half an inch from one short end and stopping half an inch from the other short end, leaving both ends intact. The cuts should be evenly spaced, about three-quarters inch apart. These cuts will allow you to weave and fold the dough into the characteristic flower shape. Work efficiently as you do not want the cut pieces to dry out.
Tip: Roll the dough as thin as possible - thinner dough creates more delicate, crispier chebakia. Keep cut pieces covered with plastic wrap until ready to shape to prevent drying.
Shape into Flowers
40 minThis is the signature step that creates the beautiful chebakia shape. Take one cut rectangle and gently weave it: pick up the strip on one side of the first cut and fold it over, pulling it through the second cut opening. Then take the strip on the other side of the second cut and pull it through the third cut opening. Continue this weaving pattern across all the cuts. Finally, bring the two short ends together to form a circular flower shape, overlapping them slightly and pressing to seal. The result should look like a flower with petals radiating from the center. This takes practice - your first few may not be perfect, but you will develop a rhythm. Place the shaped chebakia on a parchment-lined tray and cover with plastic wrap while you shape the remaining pieces. The shaping can be done ahead and the shaped cookies refrigerated or even frozen until ready to fry.
Tip: Watch video tutorials if the written description is unclear - the weaving pattern is easier to understand visually. Work gently but confidently. The seal must be secure or the cookies will unfold during frying.
Deep Fry the Chebakia
35 minHeat about two inches of vegetable oil in a deep, heavy pot or deep fryer to 350°F - use a thermometer for accuracy. The temperature is crucial: too hot and the outside burns before the inside cooks; too cool and the chebakia absorb excess oil and become greasy. Test with a small piece of dough - it should sizzle immediately and float to the surface. Working in batches of three to four pieces at a time (do not crowd the pot), gently slide the shaped chebakia into the hot oil. Fry for two to three minutes, turning once or twice with a slotted spoon, until they are deep golden brown all over and crispy. The color should be rich amber, not pale. Remove with a slotted spoon and let drain on paper towels for just thirty seconds - do not let them cool completely before the honey dip.
Tip: Maintain consistent oil temperature throughout frying - adjust heat as needed. Fry in small batches for best results. The chebakia must go into the honey while still hot for proper absorption.
Coat with Honey and Sesame
20 minWorking quickly while the fried chebakia are still hot, transfer them immediately from the oil to the warm honey. Submerge each cookie completely in the honey, turning to coat all surfaces. Let them soak for thirty to sixty seconds - this allows the honey to penetrate slightly while the cookies are still hot and porous. Using a fork or slotted spoon, lift the chebakia from the honey, letting excess honey drip back into the pot. While still dripping with honey and very sticky, roll each cookie in the toasted sesame seeds or sprinkle the seeds generously over both sides, pressing lightly so they adhere. Place the coated chebakia on a wire rack set over parchment paper (to catch drips) and let them set for at least thirty minutes to one hour. The honey will form a glossy coating as it cools. Repeat with all remaining cookies.
Tip: Work quickly - the honey penetrates best when the chebakia are still hot from frying. Be generous with sesame seeds. The cookies will be very sticky to handle but will firm up as they cool.
Common Mistakes to Avoid
✗ Dough That is Too Soft
Fix: Chebakia dough must be quite firm to hold its intricate shape during frying. If your dough is soft and sticky, add more flour a tablespoon at a time and knead until firm. Soft dough will lose its shape and unfold in the hot oil.
✗ Rolling the Dough Too Thick
Fix: Thick dough creates heavy, doughy chebakia that are not properly crispy. Roll the dough very thin - one-eighth inch or thinner. Thin dough creates delicate, crispy layers with better texture. Take your time rolling evenly thin.
✗ Incorrect Frying Temperature
Fix: Oil that is too hot burns the outside before cooking the inside; oil too cool makes greasy cookies that absorb excess oil. Use a thermometer and maintain 350°F. This ensures even cooking and proper crispiness without greasiness.
✗ Letting Cookies Cool Before Honey Dipping
Fix: The honey must be applied while the chebakia are still hot from frying so it can penetrate slightly. If they cool, the honey just sits on the surface and does not soak in properly. Transfer directly from hot oil to warm honey.
✗ Not Toasting the Sesame Seeds
Fix: Raw sesame seeds taste bland and have a pasty texture. Always toast them until golden and fragrant before coating the chebakia. The nutty, toasted flavor is essential to authentic chebakia.
✗ Shaping Inconsistently
Fix: While practice makes perfect with the intricate folding, try to make the shapes as uniform as possible so they fry evenly. Very small pieces will burn while large pieces are still raw. Aim for consistent size and thickness.
✗ Skipping the Dough Rest
Fix: Unrested dough is elastic and difficult to roll thin - it springs back constantly. The resting period is essential for relaxing the gluten. Always rest at least one hour, preferably longer, for workable dough.
Ingredient Substitutions
Instead of: Butter
Use: Vegetable oil can replace butter entirely for dairy-free chebakia, though you will lose some richness of flavor. Ghee or clarified butter works excellently and prevents burning. Smen (preserved butter) is traditional and ideal.
Instead of: Orange Blossom Water
Use: Rose water provides similar floral notes with different character. In a pinch, vanilla extract can be used, though the flavor will not be as authentically Moroccan. Orange blossom water is worth seeking out at Middle Eastern markets.
Instead of: Anise Seeds
Use: Star anise (ground) can replace anise seeds with similar licorice flavor. Fennel seeds provide a related but milder flavor. If you dislike licorice flavors, you can omit entirely and increase cinnamon, though this changes the traditional flavor.
Instead of: White Vinegar
Use: Apple cider vinegar works perfectly and some prefer its milder, slightly fruity flavor. Rice vinegar or white wine vinegar also work. The acid is important for tenderizing the dough - do not omit.
Instead of: Saffron
Use: While saffron adds unique flavor and color, it can be omitted if unavailable or too expensive. Increase turmeric slightly for golden color, though the flavor differs. Saffron is traditional but not absolutely essential.
Serving Suggestions
Serve chebakia traditionally as part of the Ramadan iftar spread, alongside harira soup, dates, and other sweets. The combination is quintessentially Moroccan.
Arrange on decorative platters in pyramids or circular patterns for beautiful presentation. The glossy, golden cookies are visually stunning and deserve attractive display.
Accompany with Moroccan mint tea, which cuts through the sweetness and cleanses the palate. The hot, sweet tea and sweet cookies are a classic pairing.
Include in the Moroccan tea table (salon de thé) alongside other traditional sweets like kaab el ghazal, ghoriba, and fekkas for variety.
Package beautifully as gifts during Ramadan or Eid - homemade chebakia are treasured gifts that demonstrate care and effort.
Serve at weddings, religious celebrations, or any festive gathering. Chebakia signals celebration and tradition.
Store in airtight containers at room temperature and bring out when guests arrive. They keep well and are ready to serve any time.
Storage & Reheating
Storage
Chebakia store remarkably well, which is why they are often made in large batches. Once completely cooled and the honey has set, store in airtight containers at room temperature for up to two weeks. Place parchment paper between layers to prevent sticking. The cookies may lose some crispiness over time but remain delicious. Do not refrigerate, as the honey will crystallize and the cookies will become too hard. For longer storage, freeze unshaped dough for up to three months, or freeze shaped but unfried chebakia for up to two months. You can also freeze fully finished chebakia for up to one month, though texture may suffer slightly. Thaw at room temperature before serving.
Reheating
Chebakia are typically served at room temperature and do not require reheating. If you prefer them slightly warm, place in a 250°F oven for five to ten minutes. Do not microwave, as this will make them soggy. If the cookies have lost crispiness during storage, a brief warming in a low oven can help restore some texture. The honey coating will soften when warm and firm up again when cooled.
The honey coating helps preserve the chebakia and keeps them moist. They actually improve slightly after a day or two as the flavors meld. If the honey makes them too sticky to store together, dust lightly with powdered sugar between layers, or ensure parchment paper separates them. Properly stored chebakia can last through the entire month of Ramadan.
Frequently Asked Questions
Recipe by

Abdrahman Idrissi
عبد الرحمن الإدريسي
Pastry & Bread Chef
View all recipes by Abdrahman →
You May Also Like
Our Ebooks

The Moroccan Vegan
$12.56

The Royal Moroccan Table — Part 1
$9.99

The Royal Moroccan Table — Part 2
$9.99
YouTube
Watch step-by-step cooking videos and learn traditional Moroccan techniques.
450+
Subscribers
150+
Videos